
Managing data and analytics projects efficiently is essential for meeting evolving user needs. Microsoft Fabric, featuring tools like Git and deployment pipelines, provides a streamlined solution.
This blog explores how to leverage Fabric’s capabilities for lifecycle management, including Git integration and deployment pipelines, to enhance collaboration, streamline testing, and ensure speedy, high-quality content delivery across different environments.
Components of Lifecycle Management with Microsoft Fabric
There are three components of Lifecycle management in Fabric
Git integration
Git, a distributed version control system, facilitates collaborative project development by allowing multiple developers to work on their individual local repository copies. This empowers each developer to make independent changes and commits to the project. This Git integration within Microsoft Fabric provides teams with the capability to:
- Collaborate– Git is a distributed version control system that enables multiple developers to collaborate on a project. Each developer can work on their own local copy of the repository, making changes and committing them independently.
- Incremental Updates – Git allows developers to make incremental updates to the codebase. Changes are tracked, and developers can merge their changes seamlessly, enabling a more iterative and collaborative development process.
- Content Versioning – Git provides version control, allowing teams to keep track of changes made to the codebase over time. This is crucial for tracking bugs, rolling back to previous versions, and maintaining a clear history of the project.
Deployment pipelines
Deployment pipelines automate the seamless delivery of updated content from development to various environments, including testing, staging, and production. Deployment pipelines in Microsoft Fabric allow teams to:
- Automated Delivery – Deployment pipelines automate the process of delivering modified content from development to different environments, such as testing, staging, and production. This ensures a consistent and reliable process for releasing software.
- Short Cycles – Pipelines enable teams to release updates in short cycles. This is often referred to as continuous integration and continuous delivery (CI/CD), where changes are automatically tested and deployed as soon as they are ready, leading to quicker and more frequent releases.
- Environment Management – Deployment pipelines facilitate the management of different environments. Developers can test changes in isolated environments before deploying to production, reducing the risk of introducing bugs or issues to end-users.
- Monitoring and Rollback – Deployment pipelines often include monitoring and alerting mechanisms. If issues arise after deployment, teams can quickly identify problems and roll back to a previous version, ensuring the stability of the application.
Variable Library
Variable library is a newly added third pillar of lifecycle management, letting teams:
- Define and manage user-defined variables in a unified way across all workspace items.
- Use variables in item definitions (such as queries) and as references to other items (for example, a Lakehouse ID).
- Reuse the same variable across multiple Fabric workloads and items.
- Adjust variable values automatically based on the deployment pipeline stage during CI/CD.
End-to-End Lifecycle management
This session guides you through loading data into your workspace. It demonstrates leveraging deployment pipelines and Git integration for collaborative development, testing, and publication of data and reports.
Prerequisites
Before you start, make sure to meet the following prerequisites.
- Ensure you have signed up for a free trial to access Fabric.
- Create workspace.
- Verify that you have access to an Azure Git repository.
- Download the Olympic_Visuals.pbix file into a Git repository that you can edit. This file is used as a sample in this tutorial. Alternatively, you can use your own semantic model and report if preferred.
Load content into workspace
In this blog, I demonstrate uploading a .pbix file from my local. You have the option to use the provided file, or you can choose to use your own file for this exercise.
- Open workspace homepage, select Import-> Report or Paginated Report. Locate the downloaded Olympic_Visuals.pbix file or load your own file from the specified location.
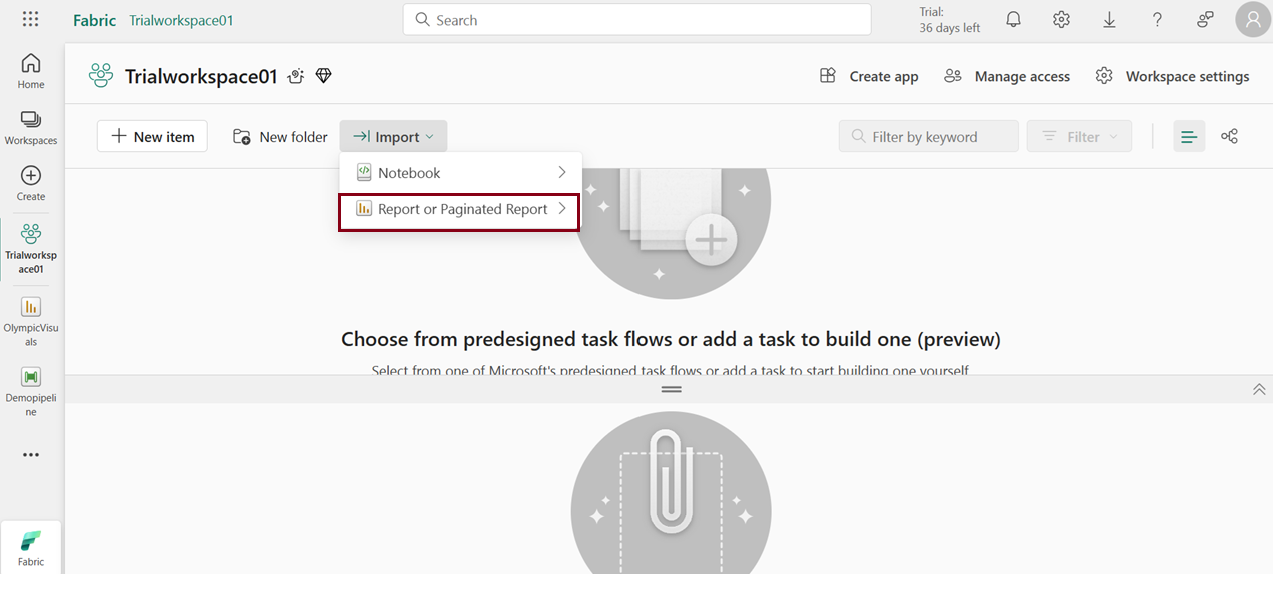
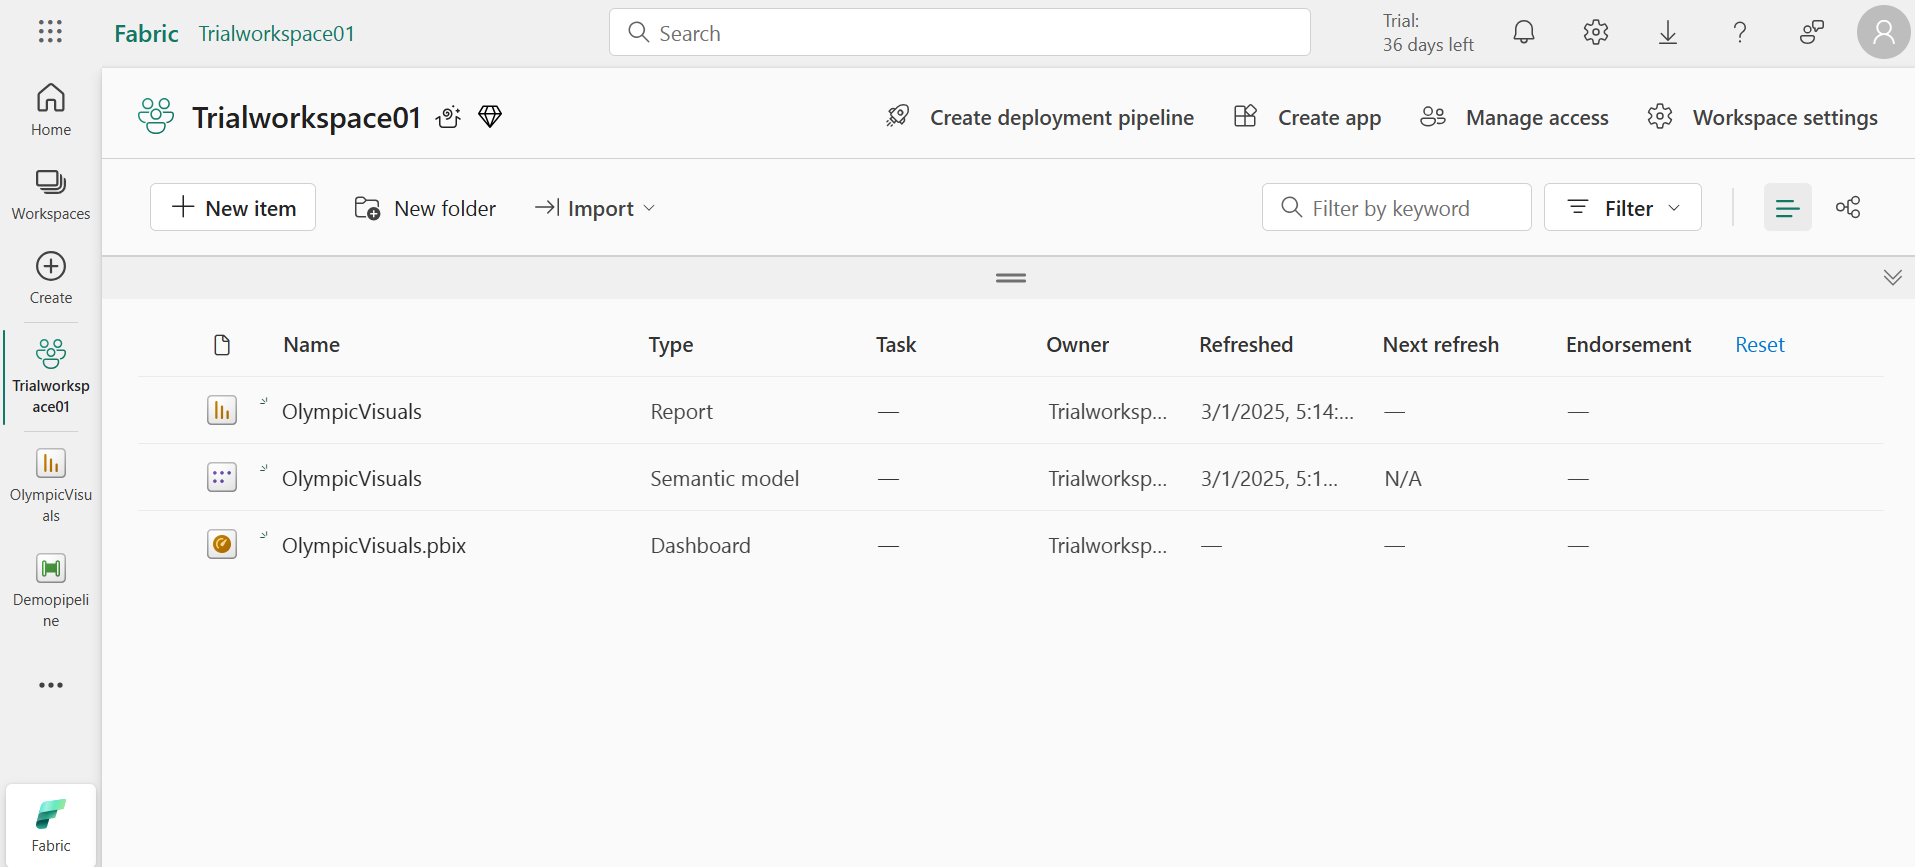
- The file gets loaded to your workspace.
Git Integration
Connecting the workspace to Git helps to track changes and revert if needed. After merging changes into the shared branch, the deployment pipeline deploys the workspace to production.
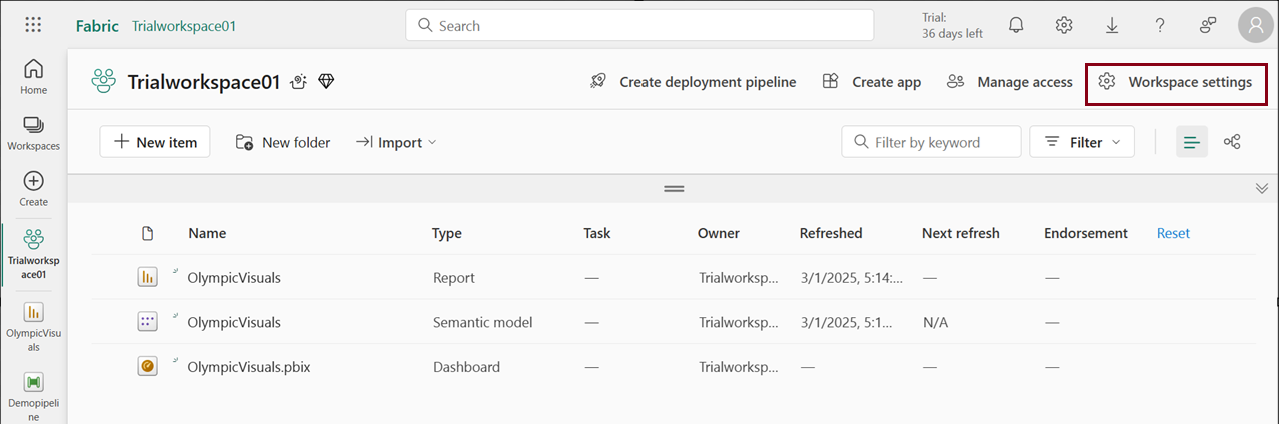
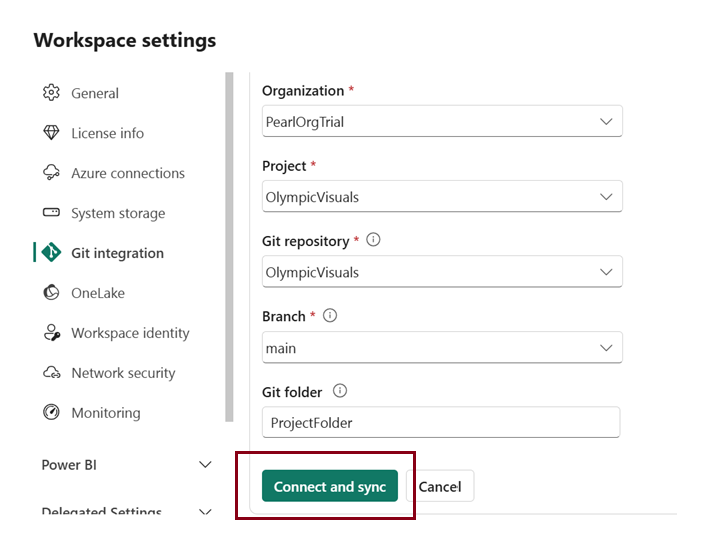
- Click on Workspace settings.
- Click on “Git integration” and you’ll be signed in automatically to the Azure Repos account associated with the Microsoft Entra user logged into the workspace.
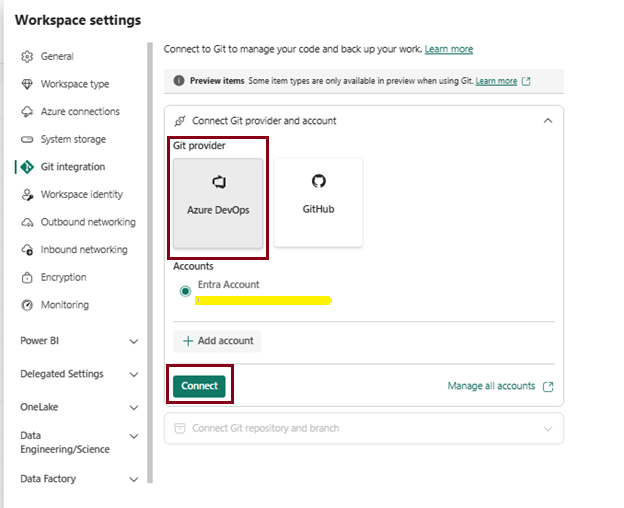
- Choose from drop down menu and fill the following details before connecting
- Organization
- Project
- Git repository
- Branch – Select the branch
- Git folder – Enter the name of the folder in the repository where you want to locate the .pbix file. This folder will be synchronized with the workspace.
- Click Connect and sync.
Once connected, the Workspace provides details about source control, including the connected branch, status of each item, and the time of the last sync. The Source control icon currently shows 0 as the items in the workspace Git repo are identical.
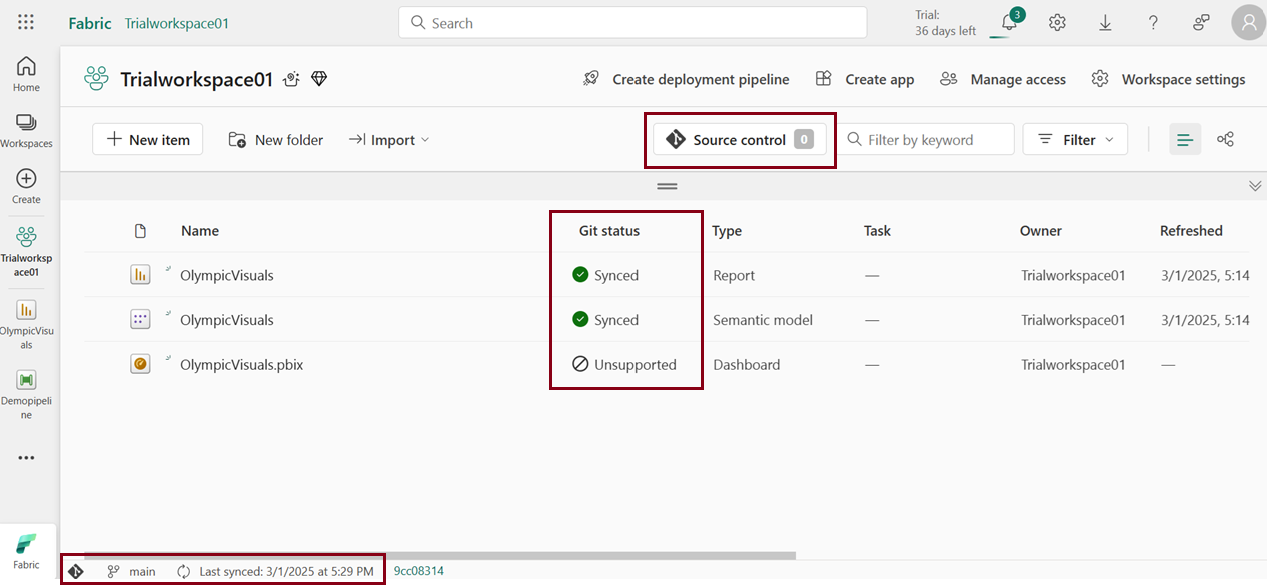
This synchronization with the main branch of your Git repo makes it convenient to monitor and track changes in the workspace.
Create deployment pipelines
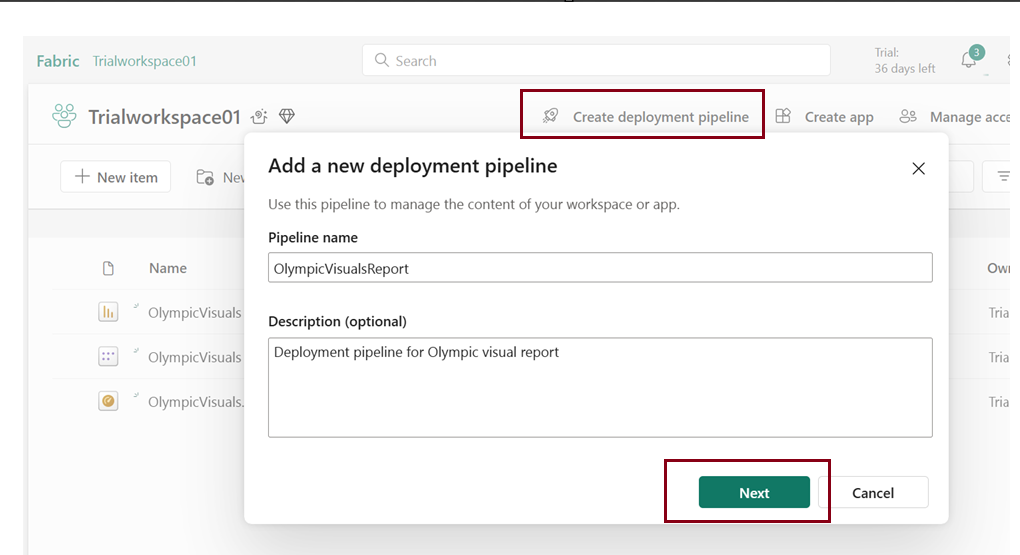
To share this workspace with others and utilize it for different testing and development stages, it’s essential to create a deployment pipeline.
- Navigate to workspace homepage, Click create deployment pipeline.
- In the “Create a deployment pipeline” dialog box, enter the pipeline name and description (optional), then click “Next.”
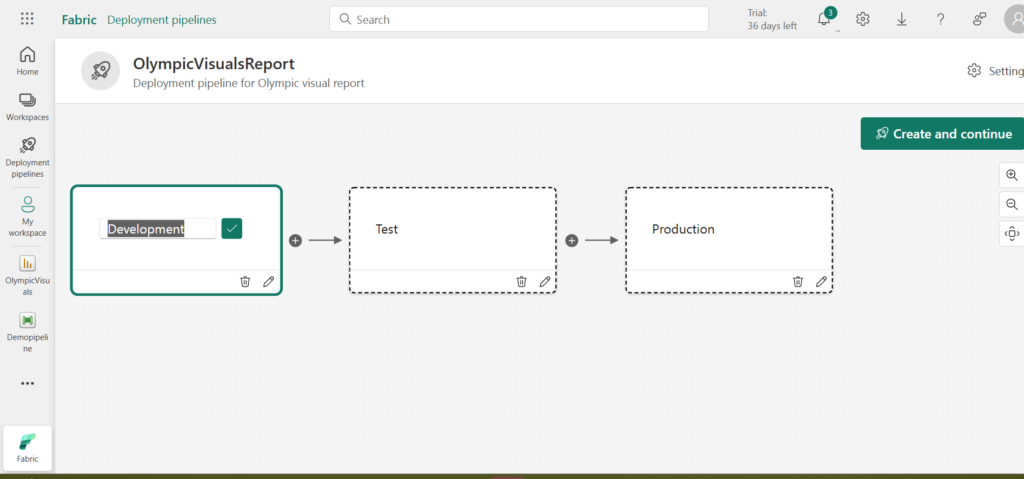
By default, three stages are displayed in the box, each with names. You have the flexibility to change the number and names of these stages. Simply click “Create and Continue” to proceed.
- I renamed Trialworkspace01 as “TrialworkspaceDev” for better understanding and additionally i created another two workspace for testing and production environment
- Assign the “TrialworkspaceDev” workspace to the Development stage and click the tick button likewise assign workspace for Test and Production as well. Now click on the Tick icon.
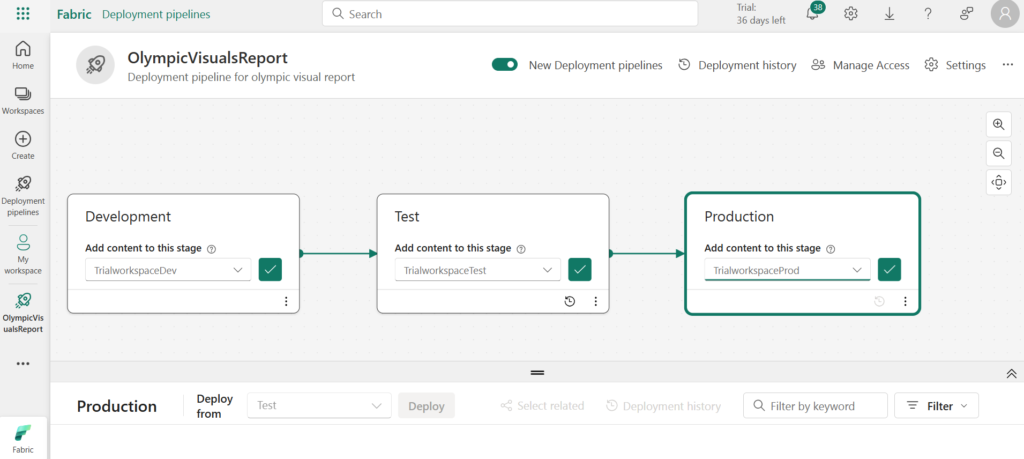
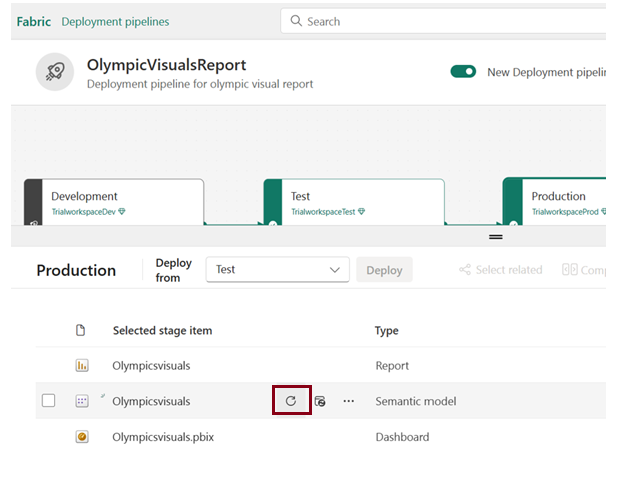
- In the deployment pipeline, the development stage showcases one semantic model, one report, and one dashboard. Meanwhile, the other stages currently remain empty.
- Click Deploy.
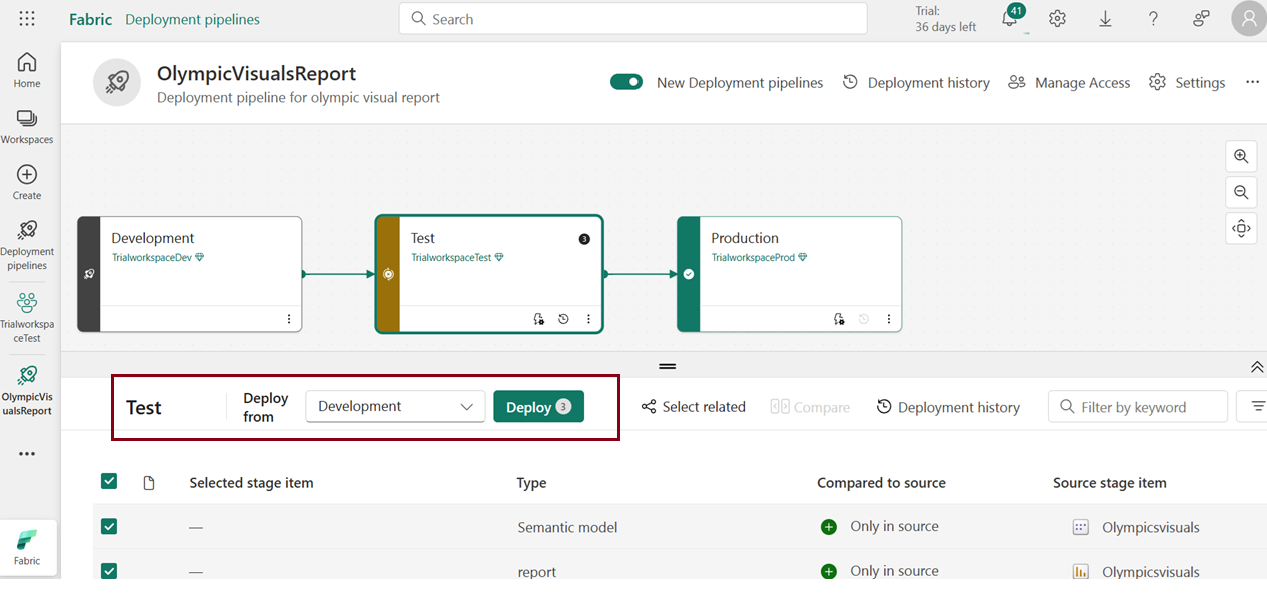
- Confirm that you wish to proceed with deploying the content to the test stage.
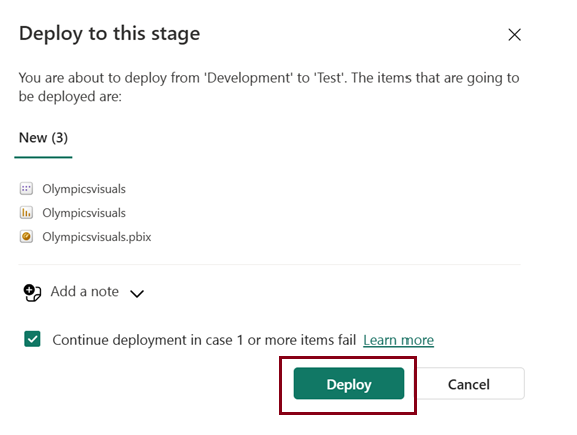
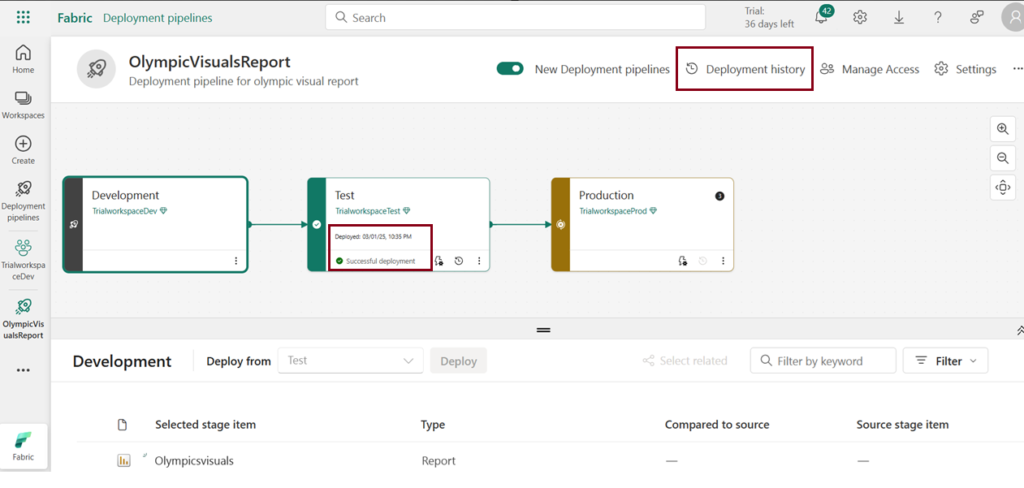
- Now you can see below the message in Test environment pipeline saying “Successfully deployed” with deployed date and time. You can also view the deployment details by clicking on “Deployment History”.
- Click “Deploy” to execute the deployment of content from the test stage to the production stage.
- To update the semantic model in any stage, click the refresh button located next to the semantic models icon in the summary card of each stage.
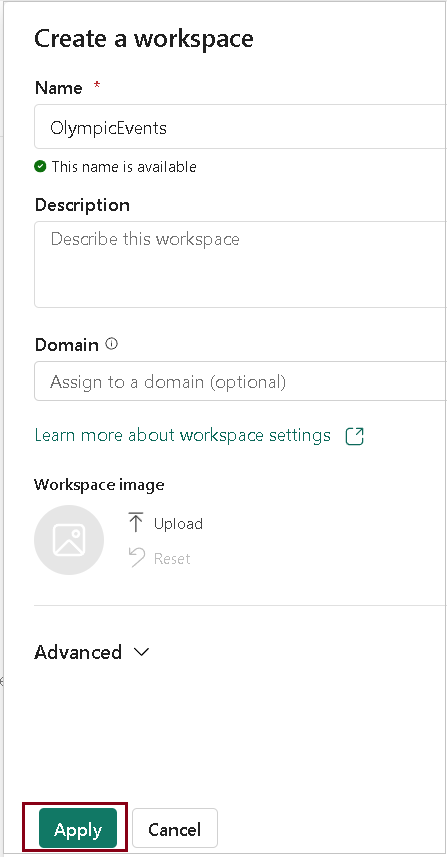
- Refer Create workspace to create new workspace.
- Fill the details and click Apply.
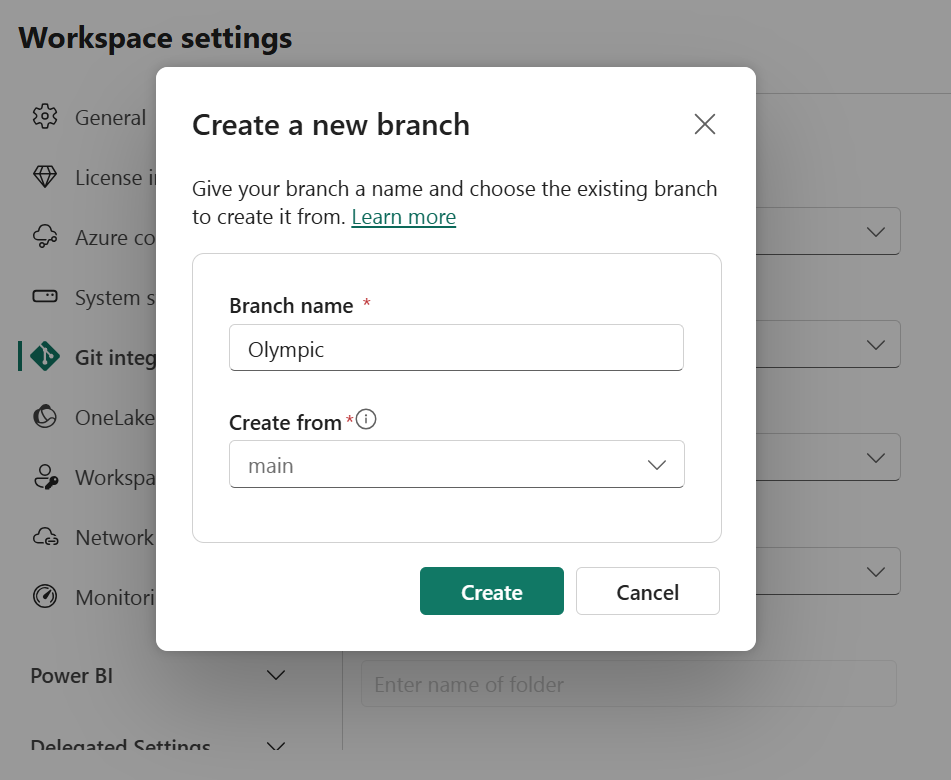
- Connect this new workspace to a new branch (Olympic) of the Git repo.
- Choose from drop down menu and fill the following details before connecting
- Organisation
- Project
- Git repository
- Branch – Select + New Branch to create a new branch. Specify the name for the newly created branch. Click Create.
- Git folder – Enter the name of the folder in the repository where you want to locate the .pbix file. This folder will be synchronized with the workspace.
- Click Connect and sync.
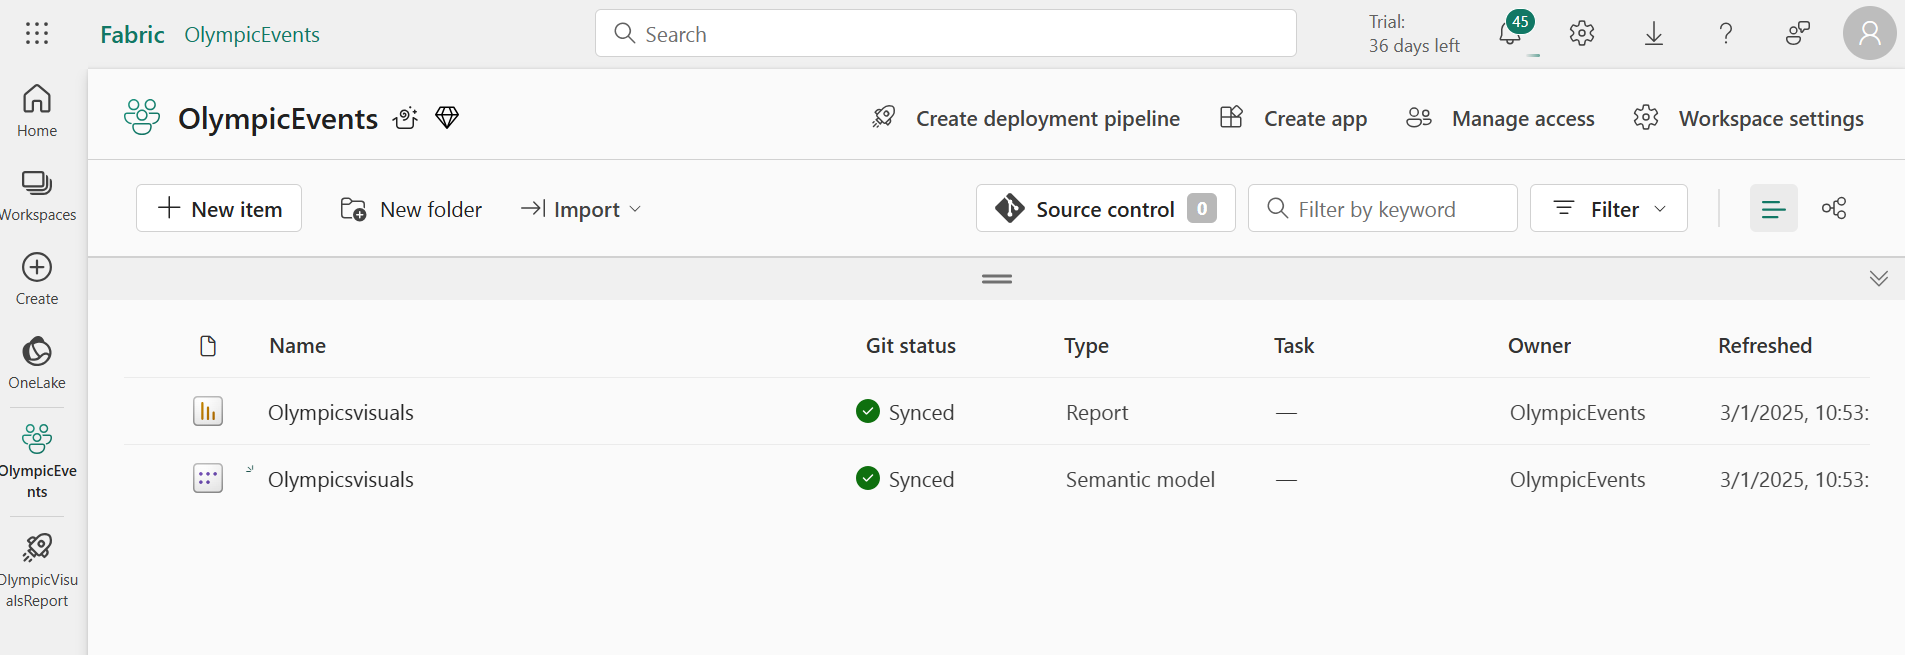
The new workspace includes the Git repo folder’s content but lacks the .pbix file due to incompatibility. Once the connection is established, the Workspace provides information about source control, enabling users to observe details such as the connected branch, the status of each item in the branch, and the timestamp of the last synchronization.
Use this workspace to modify the semantic model and report until you’re prepared to share changes with your team.
Modify the workspace
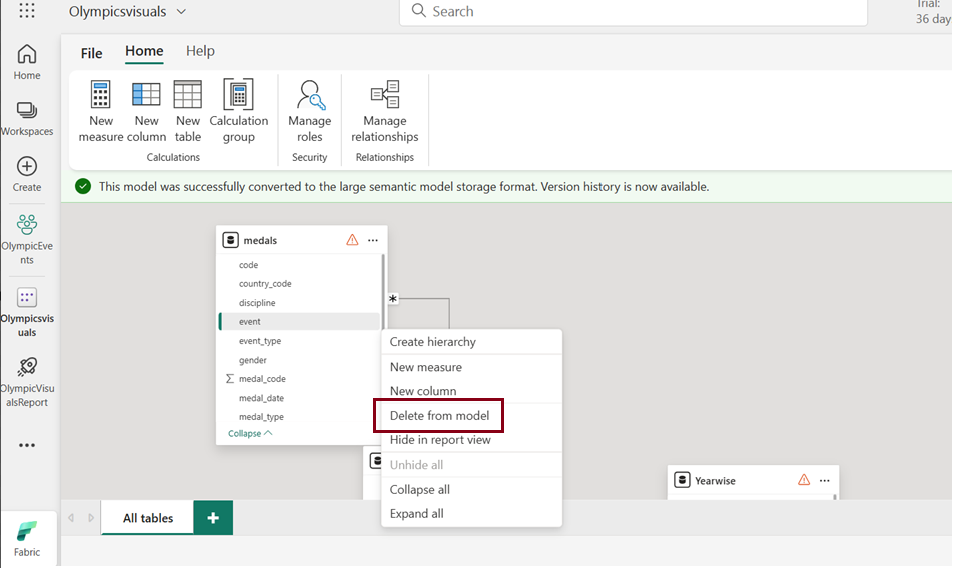
Make changes to the workspace by adding, removing, or modifying items. You have the flexibility to modify the semantic model in either Power BI Desktop or the data model. In this instance, I showcase the editing process within the data model.
- In the semantic model workspace, click on the ellipsis (three dots) -> “Open data model.“

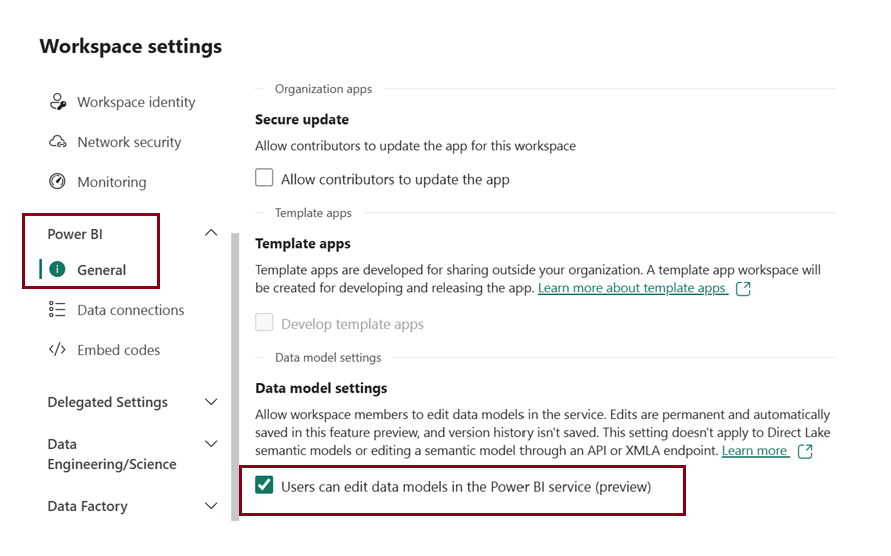
Note: If Open data model is disabled, go to Workspace settings -> Power BI ->General and enable ” User can edit data models in the Power BI service(preview)” under Data model settings.
- Right-click on the “event_type” column under the Medals table and select “Delete from Model” as this column contains repetitive data.
Commit changes
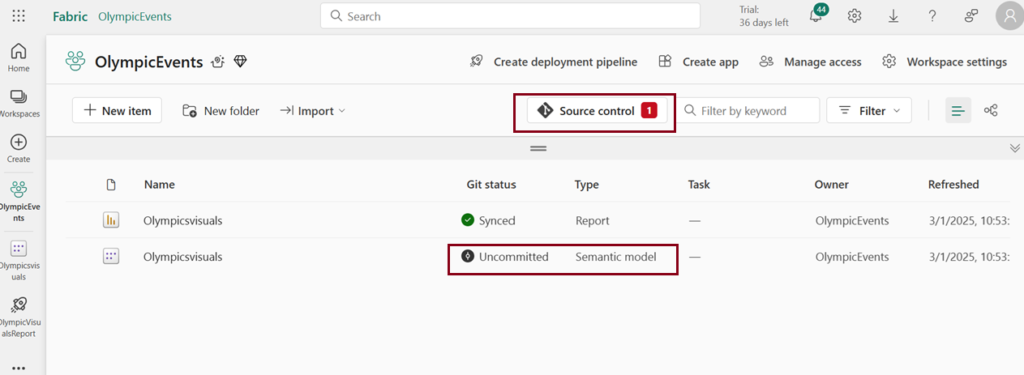
To apply this modification from the workspace to the Git branch, return to the workspace home page.
The source control icon now displays 1, indicating one item in the workspace has been altered but not committed to the Git repository.
The Olympicsvisuals semantic model exhibits a status of “Uncommitted“.
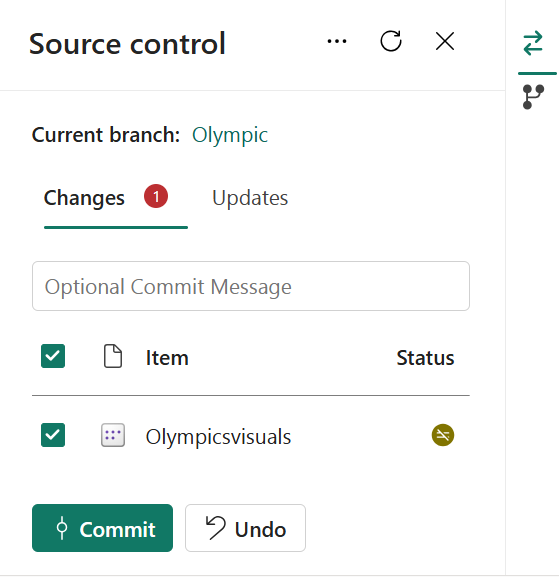
- Click the source control icon to view changes in the Git repo.
- Select the item, add an optional message, and click “Commit” to finalize the changes.
The Git status for the semantic model now shows “Synced,” confirming that the workspace and Git repository are aligned and up to date.
Pull request and Merge
In the Git repo, Click create a pull request to merge the Olympic branch with the main branch.

- Title your pull request, add a description and any other relevant details, then click “Create” to submit it.
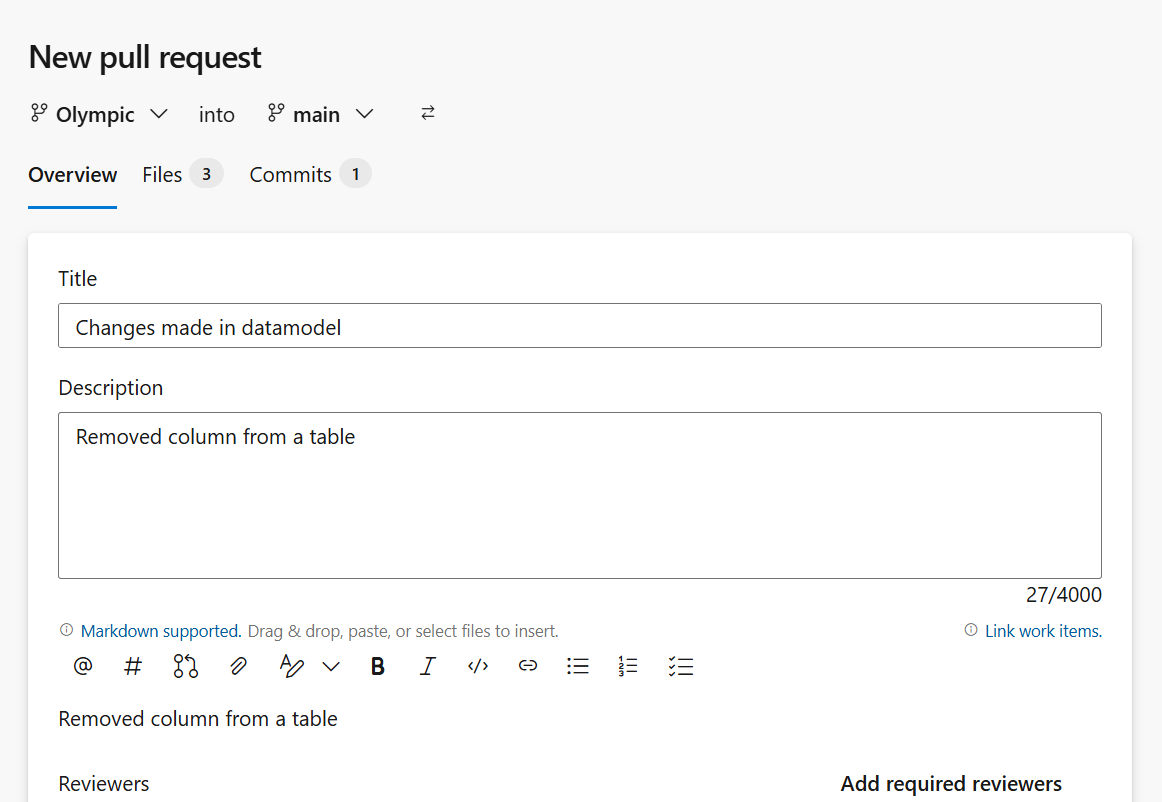
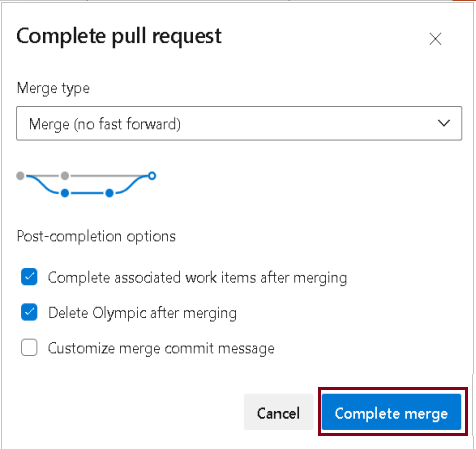
Click on “Complete”. In the Complete Pull Request window, select the merge type and choose post-complete options as necessary. Finally, click on “Complete Merge.”
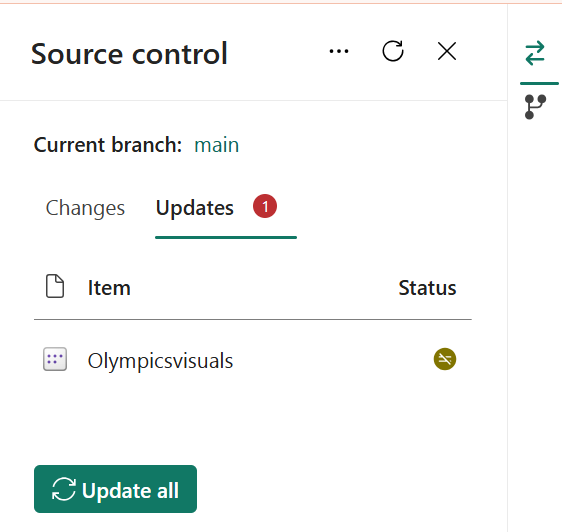
Update shared workspace
Return to the shared workspace “TrialworkspaceDev” and refresh the page. The source control icon indicates 1, signifying a difference between one item in the Git repo and the items in the TrialworkspaceDev. The Olympicsvisuals semantic model will show a status of “Update required.”

- Click on the source control icon to see the altered items in the Git repo. The semantic model should display a status of “Modified.“
- Choose “Update all” to synchronize the changes.
View deployment pipeline
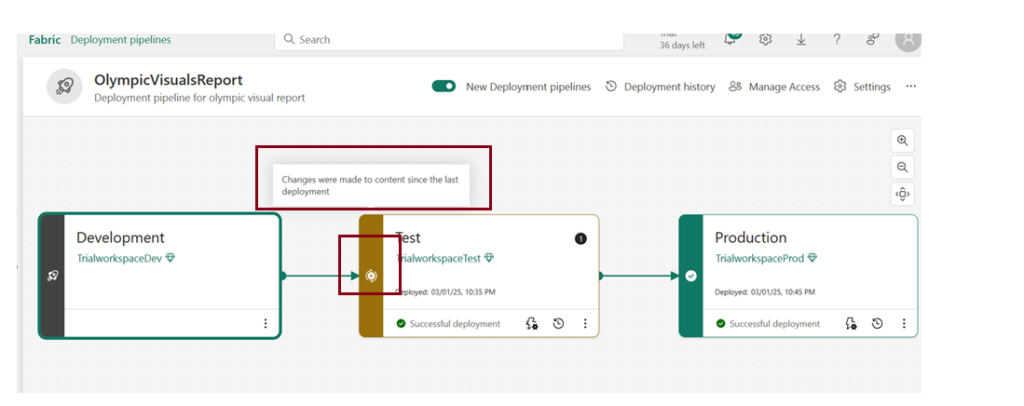
- In TrialworkspaceDev homepage, click “view deployment pipeline” to compare the content in the development stage with the content in the test stage.

- Observe the X icon between the stages, signaling alterations in content since the last deployment in one of the stages.
- Click the down arrow and choose “Review Changes” to inspect the modifications.
- Drag the bar up to see the deployment pipeline canvas in which it is mentioned “Different from source” compared to source .we can also click “compare” shown below to review the changes made.
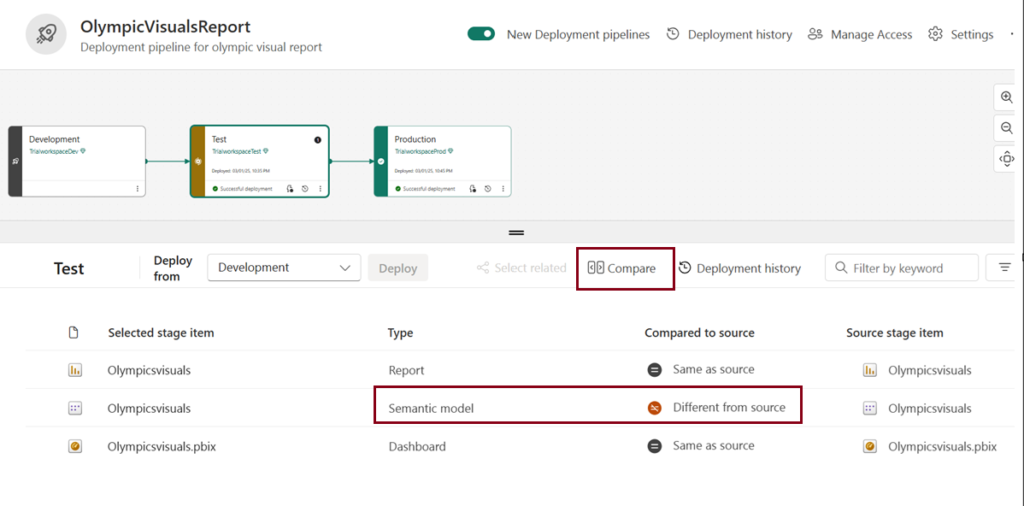
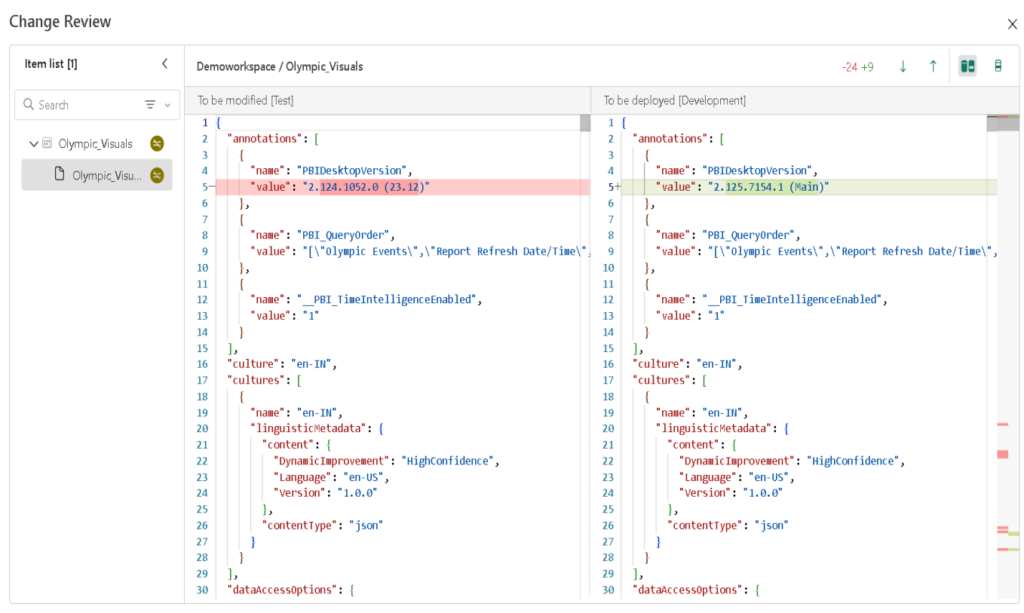
- Examine the changes, then close the window after reviewing.
After completing all changes, repeat the same process to deploy the changes to the test or production stage.
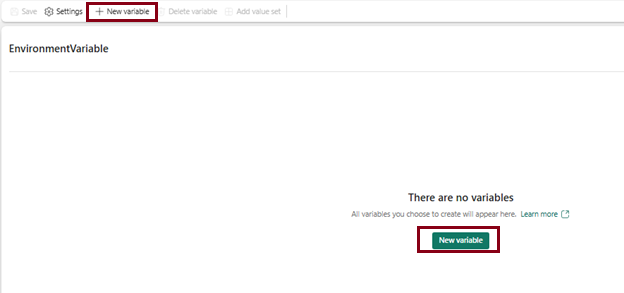
Create a Variable Library
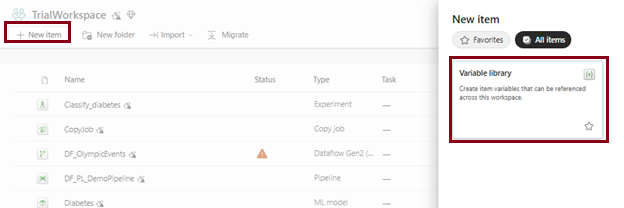
- On the workspace sidebar, select + New item (or from the Fabric home page, select Create).
- In the Data Factory section (or under “Develop data”), select Variable library.
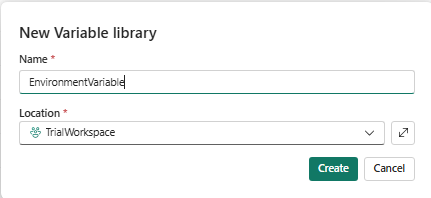
- Enter a name for the library, following the naming conventions (name isn’t case-sensitive), and select Create.
- An empty variable library opens, ready for you to add variables.
Adding Variables
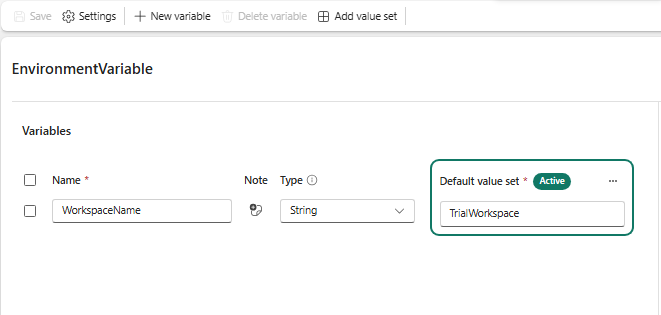
- Select + New variable.
- Enter a Name for the variable (must be unique within the library).
- Choose a Type from the dropdown — supported basic types are Boolean, DateTime, Guid, Integer, Number, and String; there’s also an advanced Item reference type for pointing to another Fabric item (like a lakehouse or notebook) by workspace ID + item ID.
- Enter a Default value, and optionally a Note.
- Select Save.
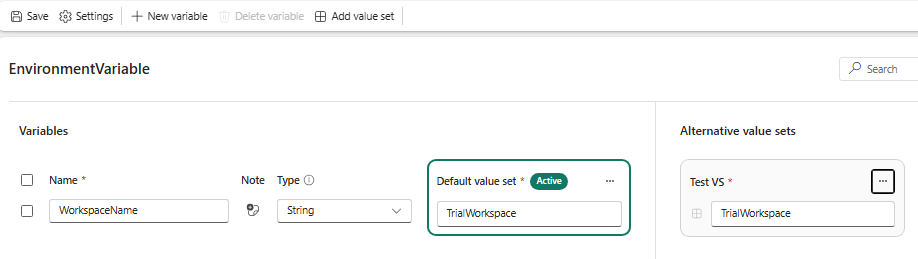
Adding Alternative Value Sets (for Dev/Test/Prod)
- In the variable library, select Add value set.
- Enter a name (for example, “Test VS” or “Prod VS”) and select Create.
- Set the values for that stage, then select Save.
- Only one value set is active at a time per stage; you switch the active set from inside the variable library in that stage’s workspace.
Using a Variable in a Pipeline
- Open (or create) a pipeline, add your activity (for example, Copy data), then click on the canvas so focus is off the activity.
- In the bottom panel, select Library variables, then + New.
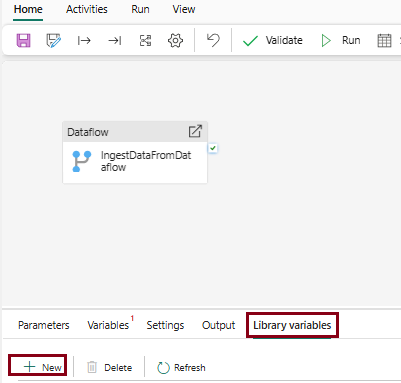
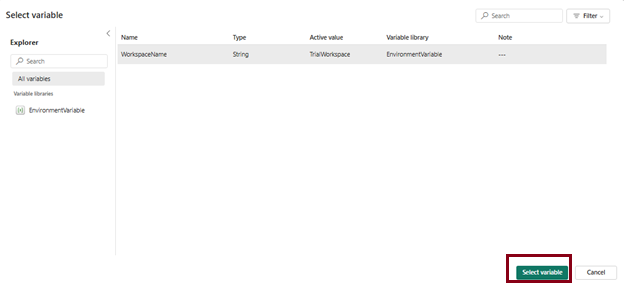
- A picker shows all variable libraries in the workspace — select your variable, then OK.
Deploying Across Stages
- Add the Variable library as an item in your deployment pipeline alongside your other content, and deploy as usual.
- Deployment doesn’t change which value set is active in a stage you set the active value set once per stage, and it persists across future deployments.
| Tags | Microsoft Fabric |
| Useful links | |
| MS Learn Modules | |
Test Your Knowledge |
Quiz |