Microsoft Fabric’s notebooks offer a web-based interactive environment for coding, experimenting, and visualizing data. Supporting various languages such as Python, Scala, SQL, and R, these notebooks enable the development of Apache Spark jobs and machine learning solutions. They also provide connectivity to lakehouses, combining data lakes and data warehouses.
This blog guides you through the process of creating, importing, exporting, saving, and connecting notebooks to lakehouses.
Key features of Fabric Notebooks
- Interactive Coding – Write code, run queries, and visualize data seamlessly.
- Language Diversity – Support for Python, Scala, SQL, R, and HTML, catering to diverse tasks.
- Machine Learning Integration – Leverage Apache Spark for creating machine learning models.
- Collaborative Environment – Collaborate with others, add comments, and track changes using version control.
- User-Friendly Features – The notebooks provide IDE-style features such as IntelliSense, code snippets, and magic commands, enhancing the overall coding experience.
- Flexibility Modes – Switch between code-first and low-code modes based on preferences.
- Data Compatibility – Excel in managing different data types and tasks, offering robust support for a wide range of data sources and formats.
How to create notebooks?
You can either create new notebooks or import an existing notebook.
Create a new notebook
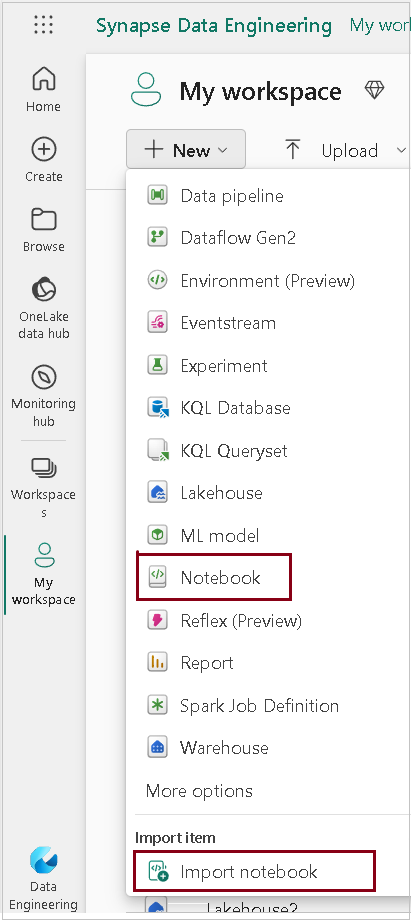
- Navigate to Data Engineering homepage, go to the workspace you want to create notebook. Click New –> Notebook.
Import existing notebook
- Go to Data Engineering or Data Science homepage.
- Select and import existing notebooks from your local computer.
- Fabric notebooks recognize standard Jupyter Notebook (.ipynb) files and source files like .py, .scala, and .sql.
- Effortlessly create new notebook items based on the imported files.

How to export a notebook?
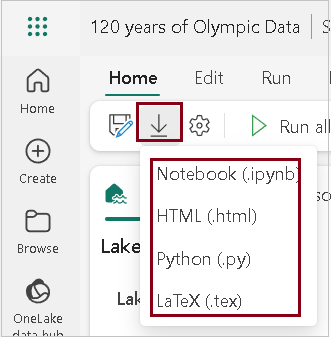
Notebooks can be exported in various standard formats, including. ipynb (Jupyter notebooks), .html, .py, and .tex.
How to save a notebook?
- Notebooks in Fabric automatically save by default when opened or edited.
- Manual save options are available, and users can create copies in the current or another workspace.
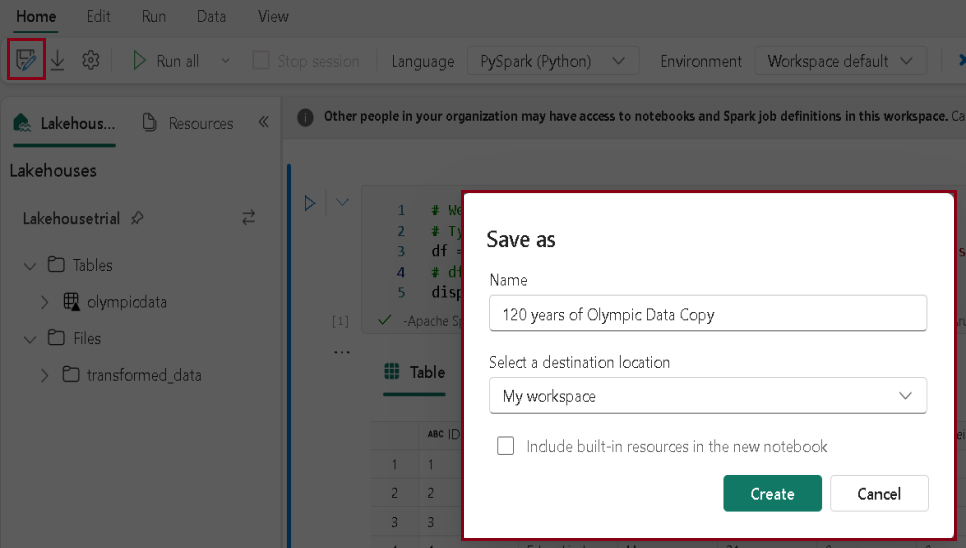
Save a copy feature
Utilize “Save as” to duplicate the notebook either within the current workspace or to another workspace.
Switch to manual save
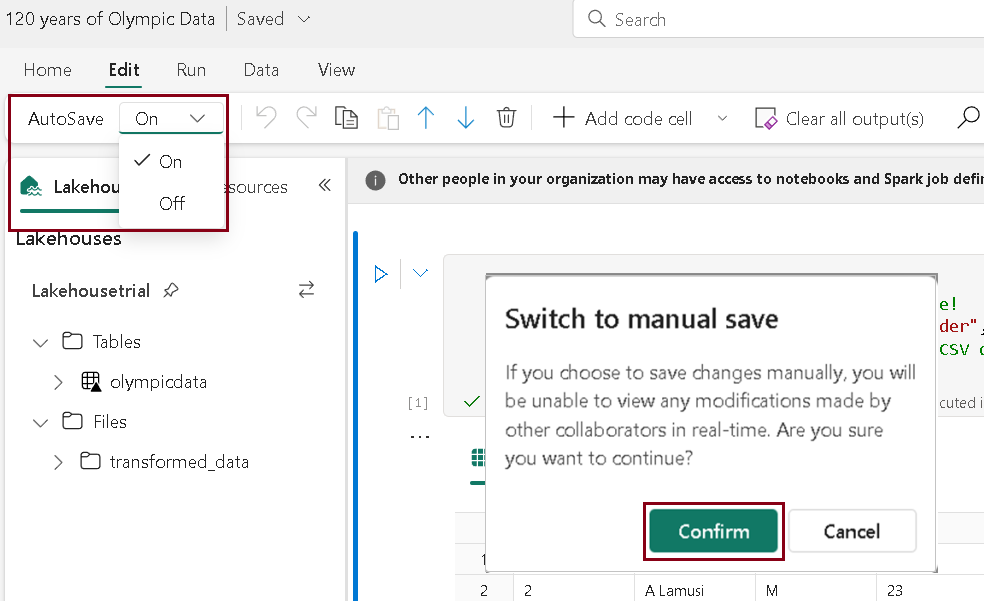
- Click on “Edit” in the menu.
- Navigate to “Auto Save” and select “Off”.
- A prompt will appear for confirmation. Click “Confirm” to activate the manual save option.
- Save changes manually with a click on “Save” or by pressing CTRL+S.
Connect lakehouses and notebooks
- Fabric notebooks support interactions with lakehouses for data storage.
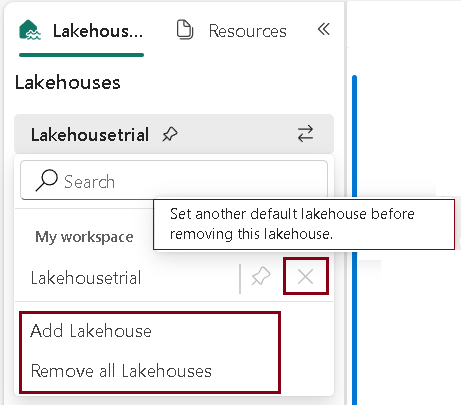
Note: You cannot remove the existing default lakehouse by clicking the X without setting another lakehouse as default. You can set a lakehouse as default by pinning it.
- Click “Add Lakehouse” to add new or existing lakehouse.
- Choosing “Remove all lakehouse” will eliminate all lakehouses added to this notebook.
Notebook resources
- Notebook resources are files that you can store and access in a Fabric notebook, such as code modules, data files, images, and semantic models.
- Facilitates reuse of common functions.
- Enhances notebooks with dynamic visualizations and interactivity.
- Create, upload, download, and delete resources effortlessly through the notebook resource explorer.
- Integration into notebook cells using simple commands like %run for code, %fs for data, and %md for images.
- Seamless work with notebook resources in Visual Studio Code using the Fabric extension for editing, running, and debugging.
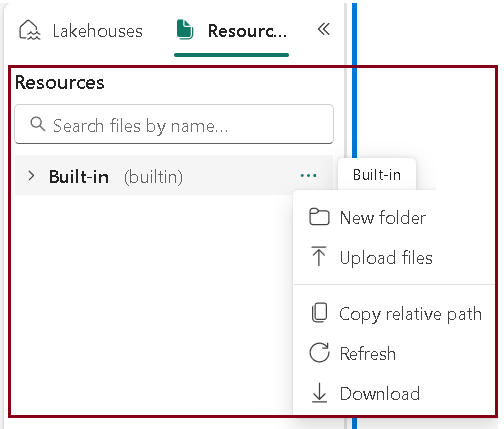
- Fabric notebooks support collaborative editing with multiple users simultaneously.
- You can see their profile, run output, cursor, selection, and editing trace.
- This feature facilitates seamless pair programming, remote debugging, and tutoring scenarios.
Sharing and Managing Permissions
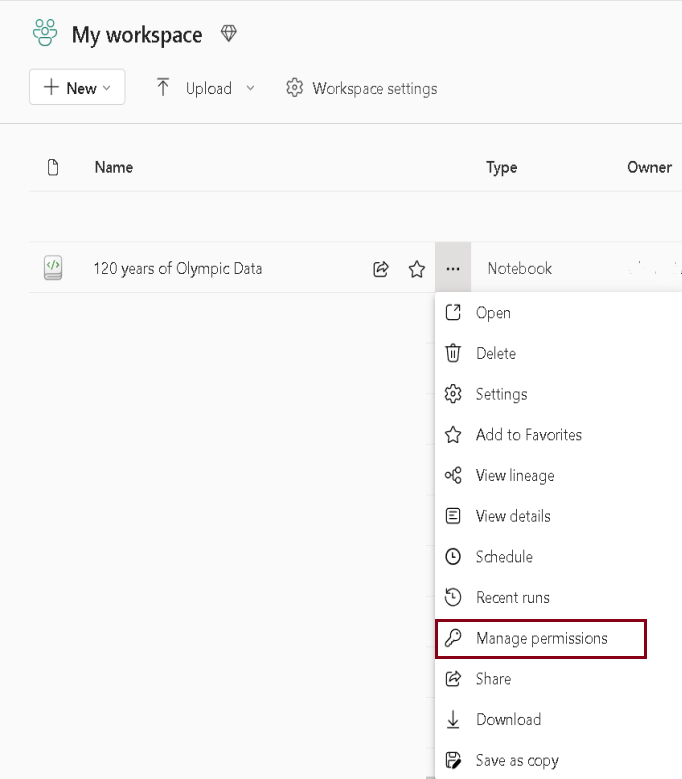
Sharing a notebook simplifies collaboration with team members, granting default viewing or editing/run permissions for authorized workspace roles. You have the flexibility to share a notebook with specific permissions tailored to your preferences.
- Click “Share” option in the toolbar to share the notebooks.

- You are allowed to choose the relevant category and grant specific permissions as needed.
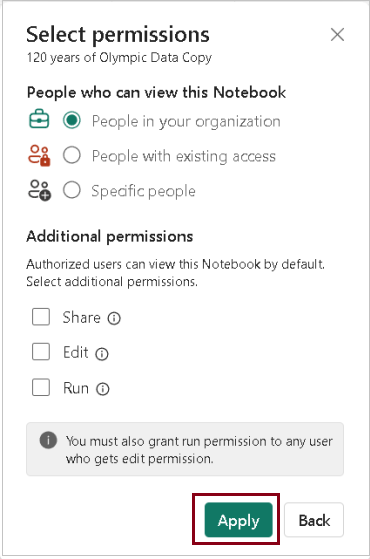
- Sharing options include sending the notebook directly or copying a shareable link.
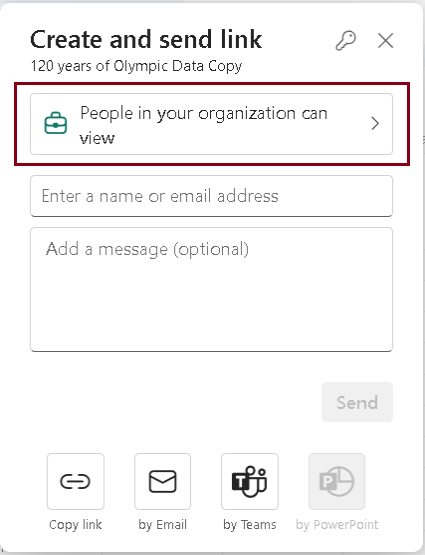
- Permissions can be managed through the Workspace item list.
Commenting and Switching Modes
Fabric introduces a valuable feature for collaboration – cell-level comments. This commenting feature encourages teamwork, allowing discussions and feedback within the notebook.
- Click the Comments button on the notebook toolbar or the cell comment indicator to access the Comments pane.
- Select code, choose “New” in the Comments pane, add comments, and then save by selecting “Post comment” or by pressing ctrl + Enter.
- Manage your comments effortlessly with options like Edit, Resolve, and Delete available under the More menu.

Notebooks have two modes
- Editing mode
- Viewing mode
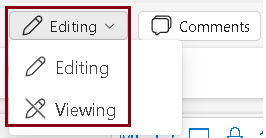
Editing mode – You can modify and execute cells, engage in real-time collaboration with others.
Viewing mode – You can only observe cell content, output, and comments; all actions altering the notebook are deactivated.
| Tags | Microsoft Fabric |
| MS Learn Modules | |
Test Your Knowledge |
Quiz |
